The Merlin Manufacturing/Repackaging
Entry screen allows the electronic batch recording of manufactured or
repackaged inventory items:
To access the screen:
Inventory
7. Manufacturing / Repackaging
1. Manufacturing / Repackaging

- Field 1.Manuf Site (Manufacturing Site) :
- Enter
the Manufacturing site code, or use ? look-up and select from the list of
options.
- NOTE: The site entered must be established first in the Site
Maintenance, and must be flagged as a manufacturing store.
- Field 2. B/No (Batch
Number) :
- Enter
<RTN> for NEW batch, or the Batch number for an existing batch record.
- To find an
existing batch number, use ? look-up and select from the list of options.
- Field 3. Ordering
Site:
- Enter the
Ordering site code, or use ? look-up and select from the list of options.
- The Ordering site will be your Main store.
- The site
entered must be established first in the Site Maintenance.
- Field 4. Sched. (Scheduled
Date) :
- Enter the
Scheduled Date (dd/mm/yy) the manufacturing is to occur on.
- Field 5. Time :
- Enter the
Scheduled time (hh:mm) the manufaring is to occur on.
- Field 6. Manuf Inv
Code (Manufactured Inventory Code) :
- Enter the Code
of the Inventory item being Manufactured (NB. You can do an inventory search in
this field).
- If the
inventory item you entered does not exist, the following message will appear:
"Create NEW Inventory Item(Y/N)". If
you select Yes, the system will invoke the 'Create Inventory Details' screen, where
new inventory items are created.
- NOTE: If you have created a Batch record previously for this manufactured inventory code, Merlin will select the formula code assigned to this previous batch record.
- Field 7. Quantity Reqd
(Quantity Required) :
- Enter the
Quantity required to be made.
- Field 8. FORMULA:
- NOTE: This is an optional field.
- Enter the
Formula code, use ? look-up and select from the list of options. The formula
must exist on file.
- Once a code is
selected, the system will open up the "Preparation Instructions"
window; (field 9) a text processing window where you
can manually edit the instructions.
- Alternatively,
press <RTN> if NOT standard formula.
- The formula code is maintained in the "Formula Maintenance" screen. This can be found as option 6. in the Manufacturing/Repackaging menu.
- Field 9. Preparation -
(Window):
- This is a
window field, which presents the Preparation Instructions.
- To pop open
this window simply press <spacebar> when the cursor is at this field, or
type <9> at the OPTION Line and press
<RTN>. - NB: If a
formula exists, details will automatically appear in this field.
- Field 10. W/Load Cat (Workload
Category) :
- NOTE: This is an optional field.
- Enter the
Workload Category, or use ? look-up and select from the list of options.
- The workload category code allows additional labour cost to be included in the cost to manufacture the final inventory product (i.e. which is the Average Weighted Cost of the final inventory product). The Labour cost = hrly rate (defined by the workload category) multiplied by 'time taken (mins)' (from creation of batch record to release of the product).
- NB: If a
formula exists, details will automatically appear in this field.
- The Workload category code is maintained in the "Workload Category Maintenance" screen. This can be found as option 4. in the Manufacturing/Repackaging menu.
** Fields 11 - 17 are where you enter the ingredient(s) that you are utilizing to make the manufactured product.
- Field 11. Inv Code
& Descn (Inventory Code and Description) :
- Enter the
(Component's) Inventory Code. (NB. You can do an inventory search in this
field).
- NB: If a
formula exists, details will automatically appear in this field.
- Field 12. Str/Size (Strength
or Size) :
- Enter the
Strength and size of the inventory item, or <RTN> to accept the default.
- NB: If a
formula exists, details will automatically appear in this field.
- Field 13. Vol (Volume)
:
- Enter the
Volume of the inventory item.
- NB: If a
formula exists, details will automatically appear in this field.
- Field 14. Man B/No (Manufacturer
Batch Number) :
- Enter the
Manufacturer’s code and Batch Number, separated by a comma. E.g. code,batch #.
- NB: If a
formula exists, details will automatically appear in this field.
- Field 15. Unit:
- Enter the
number of units to use.
- NB: If a
formula exists, details will automatically appear in this field.
- Field 16. F (Fluid) :
- Is this
inventory item a fluid? Enter 'Y' if a inventory item is a Fluid otherwise
enter 'N' if the inventory item is a solid.
- NB: If a
formula exists, details will automatically appear in this field.
- Field 17. P (Print on
Label) :
- Enter 'Y' for
the line to appear on Label.
- NB: If a
formula exists, details will automatically appear in this field.
**If the product
that is being manufactured contains more than one component, complete fields 11 to 17 until
all components have been added to the screen.
- Field 28. Requisition -
(Window) :
- The cursor will then move to the “Requisition”
field.
- This is a
window field which when opened presents the Stock Requisition Entry screen. Press <Spacebar> to pop up the Requisition Entry screen.
- The Requisition Entry screen will pre-populate with the requisitioned ingredient(s) items. Complete the requisition order by filing at the options line. This will print a picking slip.
- Collect the ingredient(s) from the main store and then confirm the requisition in the "Stock Issues Confirmation" screen.
- Walk your stock back to the manufacturing site.
- Inventory Trail: processing the requisition will transfer your ingredient(s) from the MAIN store to MANUFACTURE site.
- Field 19. Exp Date (Expiry
Date) :
- The cursor will land at the options line.
- Enter 19. to move to Field 19 to enter the
Expiry date of the batch being produced.
- Field 20. Exp Time (Expiry
Time) :
- The cursor will land at the options line.
- Enter 20. to move to Field 20 to enter the Time
on the expiry date that the batch will expire.
- Field 24. Labels:
- The cursor will land at the options line.
- Enter 24. to move to Field 24 to enter the
Product Label ID, or use ? look-up and select from the list of options.
- NB: If a
formula exists, details will automatically appear in this field.
- Field 26. Print Label -
(Window) :
- This is a
window field which when opened presents the "Label Printer" screen.
- To pop open
this window simply press <spacebar> when the cursor is at this field, or
type <26> at the OPTION Line and press
<RTN>.
- The Label ID entered in Field 24 will be the label form that will appear in the "Label Printer" screen.
- Fill in the required details for the Label ID form e.g. date prepared and expiry.
- Press P at the options line in the "Label Printer" screen to print the labels.
- FILE the Batch Record
- The cursor will then move to the Options line. Enter 'F' to file the batch record.
- If this is a NEW batch record, then the Batch number in Field 2 will change from "NEW" to the next available batch number.
- Note: The batch number is numeric and sequentially assigned.
- Print Batch Worksheet
- You will then be asked if you want to print a batch worksheet. Enter Y to print or N to move on.
- Example Batch Worksheet: manwks_246_20170518_1511.pdf
**IT IS TIME TO MANUFACTURE YOUR PRODUCT**
- Bring up Batch Record:
- Once you have completed the manufacturing process, it is time to release the product.
- Navigate back to: (Inventory -> 7.Manufacturing/Repackaging -> 1.Manufacturing/Repackaging) to open up the Manufacturing/Repackaging entry screen.
- In Field 1, enter
the Manufacturing site code.
- In Field 2, enter the Batch number.
- Field 18. Qty Made (Quantity
Made):
- The cursor will land at the options line.
- Enter 18. to move to Field 18 “Qty Made”.
- Enter the
actual number of Stock (pack size) produced post manufacturing.
- NB. This may be less or more than
Field 7 (Quantity Required).
- Field 21. Made By:
-The cursor will land at the options line.
- Enter 21. to move to Field 21 to enter the User
ID of the person making the batch.
- FILE the Batch Record
- The cursor will then move to the Options line. Enter 'F' to file the batch record again.
- You will then be asked if you want to print a batch worksheet. Enter N to move on.
- Inventory Trail: this step will ADJUST the ingredient(s) DOWN in the MANUFACTURE site & ADJUST the final manufactured inventory item UP in the MANUFACTURE site.
- Bring up Batch Record:
- Navigate back to: (Inventory -> 7.Manufacturing/Repackaging -> 1.Manufacturing/Repackaging) to open up the Manufacturing/Repackaging entry screen.
- In Field 1, enter
the Manufacturing site code.
- In Field 2, enter the Batch number.
- Field 22. Released By:
- The cursor will land at the options line.
- Enter 22. to move to Field 22 to enter the User
ID of the person that Checked the Batch.
- FILE the Batch Record
- The cursor will then move to the Options line. Enter 'F' to file the batch record again.
- You will then be asked if you want to print a batch worksheet. Enter N to move on.
- Inventory Trail: this step will release the product by TRANSFERRING the final manufactured inventory item from the MANUFACTURE site BACK to the MAIN store.
**ALL DONE!!!**
Optional Entry Fields:
- Field 25. Comments -
(Window):
- This is a
window field which when opened presents the Relevant Comments Entry screen.
- To pop open
this window simply press <spacebar> when the cursor is at this field, or
type <25> at the OPTION Line and press
<RTN>.

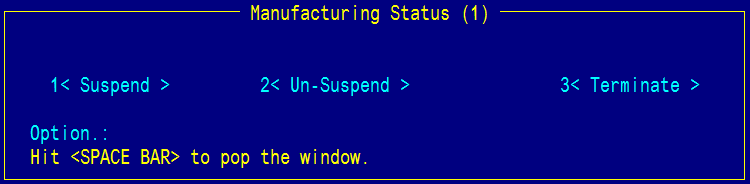
- Field 27. Status -
(Window) :
- This is a
window field which when opened presents the Manufacturing Status screen. This
can be used if the item manufactured
needs to be suspended or terminated.
- To pop open
this window simply press <spacebar> when the cursor is at this field, or
type <27> at the OPTION Line and press
<RTN>.
Display Fields:
- Field 23. Last Maint (Last
Maintained) :
- This field
displays details of when the information in this screen was last updated,
including date, time, user ID and port number.
- No
data can be entered into this field, as it is display only.
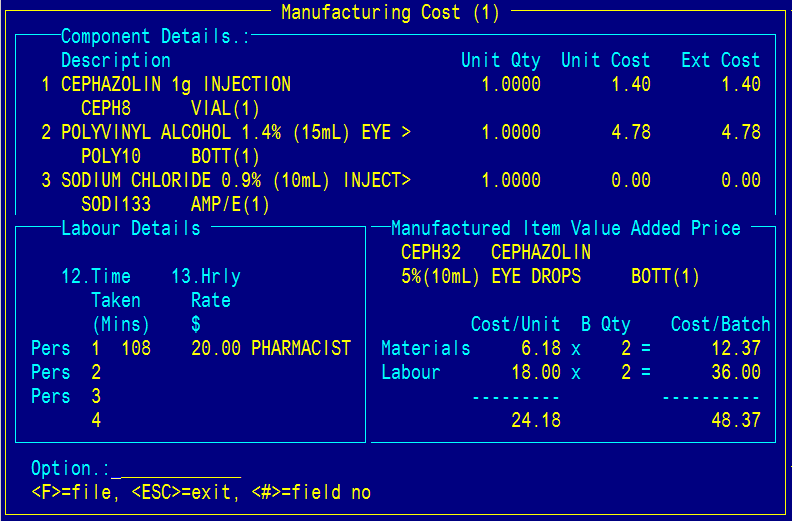
- Field 29. Cost -
(Window) :
- This is window
field which when opened presents the Manufacturing Cost screen.
- Inventory
costs are calculated based on purchasing data.
- Labour details
can be amended in field 12 and 13.