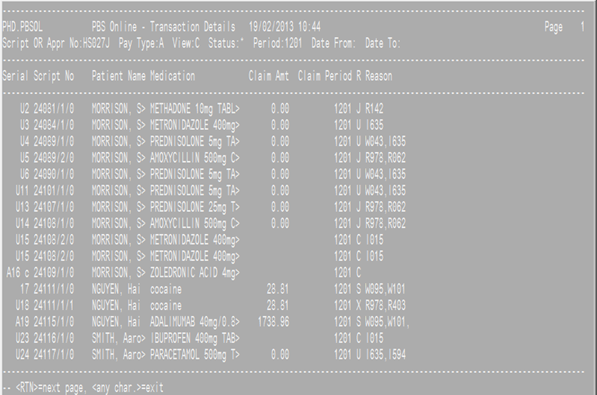
The transaction details screen is a live feed of information
between the pharmacy and Medicare. Detailed on the page is a status update of every PBS script processed by
the pharmacy and claiming information from Medicare. This includes reason codes for any
rejections, warnings, or extra information from Medicare. An estimate of the rebate to be paid is also
indicated; this amount is confirmed on the statement details page after the
payment is made to the pharmacy.
It is essential to run periodically (e.g. every day) to
capture any PBS Online rejection/warning messages that may result in non
payment from Medicare. The report can be filtered to select out various
parameters (e.g. by script type, by message type) or it can include all items.
Problem scripts can be edited directly via this screen. The report can also be
printed or exported into Excel if required.
To access the report:
Dispense
To view the transaction details, the following information
is required:
Field 1: Enter
the Pharmacy’s PBS approval number e.g. HS027J
- The ? prompt will bring up a lookup for
all local approval numbers.
- You can enter a script number to view details
for a particular item, or an approval number for a particular site to view all
scripts.
Field 2: Filter
Option – select Script type (G,C,E,R,B) or press <A> to include all
script types:
- G for
General
- E for
Entitled
- C for
Concession
- R for
Repatriation
- B for
Doctors Bag
Field 3: View
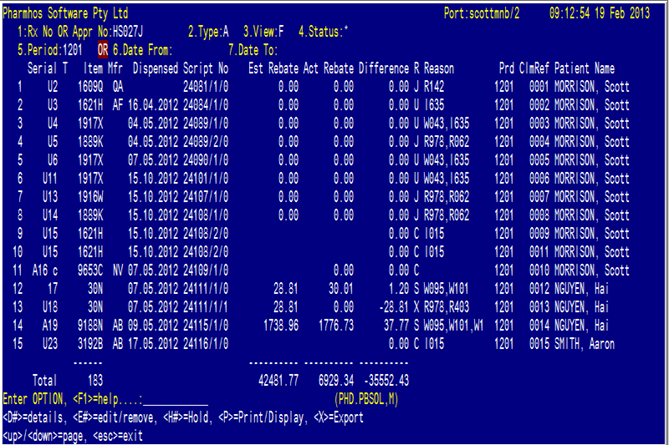
Option – This field dictates what information is displayed. Select F for Financial (includes payment discrepancies) or C for Claim list (summary version).
- The
main difference is the prescription item is included in the detail on the Claim List.
- However,
the Financial view contains a more
complete picture of the prescription claim details.
Field 4: Status: Filter Option – select which
items to display (e.g. rejections only) or press <*> to include all
scripts regardless of status.
- “O” for OK to send in script bundle (this
groups together A and S)
- “I” for
Items with a problem (this groups
together W, R, B and H)
- “N” for Non-CPAP items with a problem
- “W” for Waiting to send
- “A” for
Accepted
- “R” for
Rejected
- “S” for
Send Paper – Pending
- “H” for Rejected, paper required
- “C” for
Cancelled
- “B” for
Unable to Cancel
- “X” for
On Hold
Field 5: Enter PBS claim period (e.g. 1007)
or
Field 6 & 7: Enter date range
The report automatically appears on the screen.
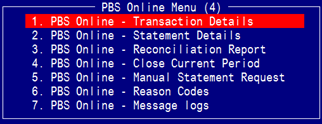
If you select “F” for Financial View in field 3, an example
report is shown below.
- To view details of a script: press D and the line number e.g. D26
- To edit a script: press E and the line number e.g. E26
- To place a script on hold: press H and the line number e.g. H26
- Print/Display a report: press P
- Export a report to Excel: press X
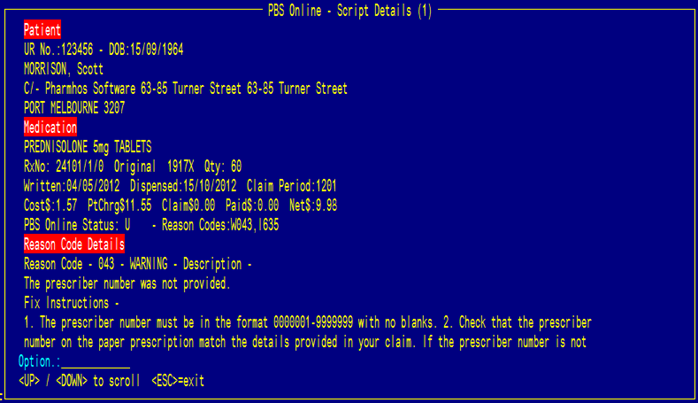
“D#” – Details
Enter D and the line number required and a detailed prescription window will open. This window is a display only and no data can
be entered here. If the item has been
issued with a reason code from Medicare, further details are outlined.
“E#” –
Edit/Remove

***To Reclaim a script you must use the prompt W in the Dispense Screen. This will
generate a new serial number***

Enter P and the following message will appear.


Enter X and a message will appear with the export drive destination. Check the details are correct and press Enter for the data to be exported to
Excel.

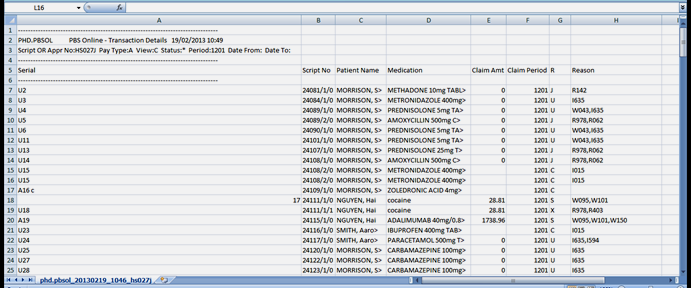
Below is an
example of the exported data in Excel. Make sure a blank Excel worksheet is
open before you export the report from Merlin.